
When you ran the Windows 10 upgrade on your computer, it gave you 30 days to roll it back. Now that you’re sure you want to keep with Windows 10 (I sure do!), it’s time to recapture that chuck of your hard drive that’s like a stack of junk in your garage.
Have you ever forgotten about throwing something away, then spent hours and hours looking for it forever after? That’s what deleting the c:\windows.old folder will do to your computer – that location is in the registry, and it looks for it if it’s not there, slowing down your computer at the oddest times.
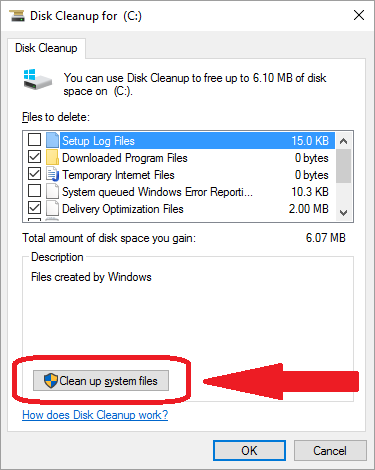
So the right way to recapture the space is by clicking the Start button (nice to have that back, eh?), type “Disk C” and press enter when Disk Cleanup shows up at the top of the search list. At the bottom of the Disk Cleanup dialog box, find the button off by itself for [Clean up system files].
Clicking this button makes you wait for another search, but it finds several more items you’ll want
to delete:I’ve seen this as high as 45GB – you can park something else in that space now!
You still have the same choices as without clicking the [Cleanup System Files] button – Windows Defender, Downloaded Program Files, Temporary Internet Files…I chose to keep only Setup Log Files (because they’re only KB, and are useful in troubleshooting applications) and System error memory dump files and System archived Windows Error Reports (because I’m a computer mechanic, and those are tools to me). Everything else goes!
Just to be sure, Windows give you one more chance to chicken out, and you have to click the [Yes] button. (The default is [No], and you will have wasted your time.)
Thereafter, you’ll probably only think of Disk Cleanup when you do your weekly cleanup of Temporary Internet Files from Internet Explorer or Edge (right?). By the way, you still can do this in Edge, it’s just buried a bit deeper: the three dots button top right, the Clear browsing data: [Choose what to clear] (verify all selected), then hit the [Clear] button. Don’t worry about the [Show more] settings, but do hit the [Clear Bing search history] if you’re sensitive about showing your life to the internet (and maybe other users of this computer).
So be sure to clean your internet caches and run Disk Cleanup every week, but you’ll never capture this many GB in one shot from your regular Saturday housekeeping. This is the big one!
Bill Sullivan
Originally written by NHSoCal Technical Instructor Bill Sullivan, MCSA x8, MCTS x5, MCITP x4, MTAx3, MCSE x2, MCDST, MCT, CCNA, CISSP, CASP, CIWA, CompTIA x5, LSSGB

